Could this tiny Cmdlet save your business APIM from a disaster?


Saif Al-Zobaydee
Systemutvecklare
I’ve recently started working with an awesome team, and we work almost exclusively with the Azure API Management (APIM) service.
Being an AWS certified solution architect and a community builder, Azure has been kept to the side. By starting with this assignment and getting some time to read/watch tutorials, jumping between azure services, and scrolling through blades “azure tabs.”. (Are they still called blades?) motivated me to create this article, mainly to think big and serve others who might find- or lead themselves to a similar spot :))
This tiny PowerShell cmdlet scripts can help you remove some clicking around the azure portal and guarantee the outcome of a task without (or at least almost without) human error. Who does not like a production-ready solution?
These commands can be run manually or added to the Azure Automation Workflows. They can be combined and paired with other cmdlets/scripts to automate complex tasks.
The problem:
The team has been going at it, building products, APIs, operations, and all things needed to grow and help its customers. But what happens if something would happen to the region where your APIM service is running? Given time, errors can be made, and even natural disasters can happen. Luckily the Az module has an easy cmdlet that lets you mitigate a disaster. Let’s find out how we can achieve this level of business reliability, and we will start by:
1. writing a tiny script to back up our APIM service.
2. script the restoration of our backup into a new API Management service instance. Sounds good, right? Let’s dive in :)
Our base:
I will assume we already have an Azure APIM service in place. (If not, it’s easy: search for API Management service, click ‘Create API Management’, fill in the blank, choose the region nearest to you, the ‘Developer (no SLA)’ for the pricing tier click ‘Review + create’. All of this is on the first page. the creation/deployment will take around 20min )
Let’s call this API Management service “untapped-api” in a resource group called “untapped-api-rg”, where I have my products (a product is a collection of one or more APIs, an API is a collection of one or more operations, and operations are your usual verbs like GET, PUT, DELETE)
Weapon of choice:
Into PowerShell from your own local PowerShell where you have installed the Azure PowerShell or using the “Cloud Shell” in the portal launch icon (as shown below)
But hey, there is a third way. Did you know that you can access the shell directly from its own direct link? Check it out on https://shell.azure.com/. How cool is that? It did time-out on me twice before starting, though :(
Installing the new Az module into PowerShell:
In PowerShell, we need to connect to Azure and use the “new-and-none-outdated” Az commands.
First, we need to install the module. It is recommended to install this only for the current user. And there is an awesome cmdlet for it.
But before we do it, make sure to remove the old AzureRM (if you have it installed) because it is not supported to have both the AzureRM and Az module installed.
Now in a new PowerShell session type:
PS> Install-Module -Name Az -AllowClobber -Scope CurrentUser
#the PowerShell gallery (PSGallery) is not trusted by default so we need to #accept the warning and sometimes run as admin or sudo the command for it #to work
#This is the warning:
Untrusted repository
You are installing the modules from an untrusted repository. If you trust this repository, change its
InstallationPolicy value by running the Set-PSRepository cmdlet. Are you sure you want to install the
modules from 'PSGallery'?
[Y] Yes  [A] Yes to All  [N] No  [L] No to All  [S] Suspend  [?] Help (default is "N"): Y
Connect to Azure:
Now that we have the Az module we can connect to Azure via PowerShell, And I’ve been doing all of this while on my macOS. It feels a bit like I’m crossing some lines here, but it works on Windows, macOS, and Linux platforms, hah!
PS> Connect-AzAccount
#this will pop up a browser for you to login to your account
When you've logged in you'll get
Authentication complete. You can return to the application. Feel free to close this browser tab.
BOOM! first success? :)
## if and only if you have many subscription, choose the "right" one by setting its context otherwise it will choose your account subscription :)
PS> Set-AzContext [SubscriptionID/SubscriptionName]
Creating the storage, context, and container for our backup
Now that we got in. We need to create a new Microsoft Azure Storage Account in the same resource group to store our APIM backup in an Azure Storage blob. Do you remember what my resource group was called?
#always declare your variables so we dont hard-code them multiple times
PS> $resourceGroup = "untapped-api-rg"
PS> $location = "northeurope"
# now we prepare a name for our storage account
#between 3 - 24 chars, numbers and lower-case letters only
PS> $storageAccountName = "untapped1api2storage"
PS> $skuName = "Standard_LRS"
PS> New-AzStorageAccount -ResourceGroupName $resourceGroup `
     -Name $storageAccountName `
     -Location $location `
     -SkuName $skuName
# you would want the -SkuName to be Standard_RAGRS so it would be geo-redundant but for testing this functionallity we are using the Locally redundant storage
Not specifying a ‘Kind’ in the command above would create a StorageV2, which works just fine for our need.
If you plan on using BlobStorage, then the access tier, which is apparently used for billing, is required.
PS> new-azstorageaccount -ResourceGroupName $resourceGroup -Name $name -Location $location -Kind $kind -SkuName $skuname -AccessTier HotThis might take a couple of seconds, but eventually, the shell will get back to you with a ProvisioningState Succeeded.
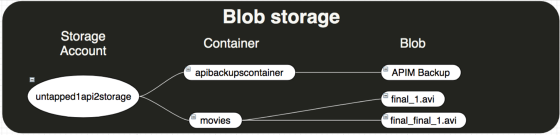
For a little preparation on how blobs work. Below is an image of three types of resources that Blob storage offers (The storage account, a container in the storage account, and a blob in a container).
Now that we have a storage account, we need its keys to create a storage context to connect to our storage and create a container to store our APIM backup.
To get the keys, we can use the Get-AzStorageAccountKey, and it would return an array of keys. We need to extract our first key value and assign a variable ($storageKey?) to use it later on to get the context.
#We still have our $resourceGroup and $storageAccountName variables that we #created earlier when we were creating our storage account.
PS> $storageKey = (Get-AzStorageAccountKey -ResourceGroupName $resourceGroup -AccountName $storageAccountName)[0].Value
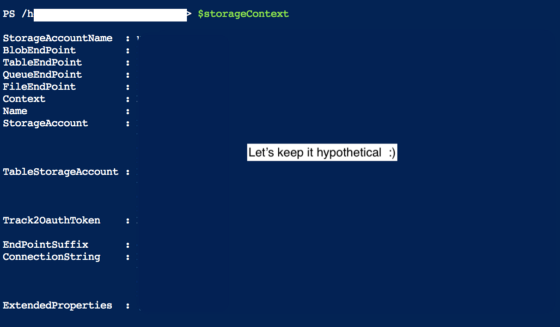
Now that we have the key, let’s create the context.
PS> $storageContext = New-AzStorageContext -StorageAccountName $storageAccountNameAnd this little guy (storage context) has a lot to say :) let’s see some of them
Time to create the container with our context, and we want to restrict access to only the storage account owner. We can achieve that by adding the -Permission flag with an Off option.
Also, note to self: “ ‘anApiBackupContainer’ is invalid. Valid names start and end with a lower case letter or a number and have in between a lower case letter, number or dash with no consecutive dashes and are 3 through 63 characters long.”
#New-AzStorageContainer creates a new azure storage container
PS> New-AzStorageContainer -Name "apibackupscontainer" -Context $storageContext -Permission Off
#remember the container name for later
Now I’ve been doing all of this using shell.azure.com, but it seems to return a 403 AuthorizationFailure… It is getting late; I’ll have to investigate this tomorrow.
New day new opportunities:
What went wrong yesterday? I guess it was just a one-time thing with the cloud shell (shell.azure.com) but changing back to my private macOS shell made it worked as it was supposed to, with no errors or anything. It gave me the Blob End Point and showed me a summary of
Blob End Point: https://untapped1api2storage.blob.core.windows.net/
Name                 PublicAccess         LastModified
----                 ------------         ------------
apibackupscontainer  Off                  11/13/2020 21:49:50 +00:00
Now we’ve come a long way together, let’s finish this part by creating a backup for the APIM!
# -Name here is of course the name of our APIM
PS> $apimName = "untapped-api"
PS> $containerName = "apibackupscontainer"
PS> $targetBlobName = "apibackupscontainer.apimbackupblob"
PS> Backup-AzApiManagement -ResourceGroupName $resourceGroup -Name $apimName -StorageContext $storageContext -TargetContainerName $containerName -TargetBlobName $targetBlobName
The $targetBlobName is the name of the container and the name of the blob.
Just like this lionfish that looks like a combination of a zebra and a fish, your “blob name” will be a combination of the container name and the blob name. I actually wanted the DBZ fusion photo, but this is what I got from Unsplash :)

It took about 10 min to back up this APIM.
Now that we have successfully created the backup, let’s see it in the Azure Portal.
Click Storage Accounts -> (our) storage account -> scroll down to Blobs service and click on Containers -> click on (our) container, and we can see the backup blob :)
Look at it, looking all cool and fancy sitting there in our container.
As a bonus for coming this far, I’ve made an easy script combining all the things we did above in a single easy-to-use PS script file. Change the variables at the beginning and run whenever you like or optimally in your automation tasks :)
Notes:
Although this is presented as a disaster recovery plan, it also can be used as a replication mechanism for your API Management Service; it would replicate your entire APIM service to a new instance in the resource group of choice.
Cautions:
Each backup expires after 30 days. If you attempt to restore a backup after the 30-day expiration period has expired, the restore will fail with a Cannot restore: backup expired message.
What will not be backed up and what to do:
- Usage data used for creating analytics reports isn’t included in the backup. Use Azure API Management REST API to retrieve analytics reports for safekeeping periodically.
- Custom domain TLS/SSL certificates.
- Custom CA Certificate, which includes intermediate or root certificates uploaded by the customer.
- Virtual network integration settings.
- Managed Identity configuration.
- Azure Monitor Diagnostic Configuration.
- Protocols and Cipher settings.
- Developer portal content.
And with this first part being completed, I have managed to add two pull requests to the azure docs on GitHub ;)
Well? would this cmdlet be a possible candidate in your business defense toolkit? I would want to save some more configurations to the back-up, don’t you? How would you backup or move one or more of the list above the things that will not be backed-up? Any idéas?
— Saif;
Part two (restore) is coming up next :)